Configuring TLS Certificates for SQL Server
- Document Type: KB
- Released: 2025-07-28
Contents
- Preface
- A. Considerations
- B. Instructions
- Appendix A: TLS Levels
- Appendix B: Connection Strings
Preface
This document provides step by step instructions for how to request, sign, and deploy Certificates for use by SQL Server in establishing Transport Layer Security (TLS).
A. Considerations
Before getting started with step by step details, it's worthwhile to review WHY we even want to use certificates (and what our options are surrounding them); and to review what you'll need before you get started, along with some warnings or caveats to watch out for - in order to prevent any unsightly outages you might otherwise bump into while securing your environment.
The Two Main Uses of Certificates
Certificates serve two major purposes:
- First, TLS Certificates facilitate the encryption of data between clients and servers - which, in turn, ensures that data is communicated securely and without risk of modification.
- Second, while frequently overlooked, Certificates also help with authentication - i.e., in confirming that a Server is what it purports to be - simply because propery signed certificates have to be signed by a Certificate Authority (which helps validate claims made by the certificate itself).
Importantly: it IS possible to use Certificates for encryption while NOT using them for authentication. To do this, you would just use a self-signed certificate (or a certificate signed by a 'non-trusted' authority).
For example, if you visit a website that flashes the "This certificate can't be trusted" message - you're visiting a site with a self-signed (or otherwise non-trustworthy certificate). Your options here are simple: either refuse to visit the site in question, or "trust the certificate" - where you're now, effectively, saying: "I'm reasonably confident that this server is what it purports to be, please USE the (typically self generated) cert for encryption as I'm not worried about this server being an imposter, but I DO WANT MY COMMUNICATIONS protected (private and secure)."
Stated a bit differently, if all you REALLY want or need is a way to force encryption to/from SQL Server, you can achieve this WITHOUT going through the process outlined below. Granted, if you go this route, you WILL LOSE the benefit of having a Certificate Authority (or CA) VALIDATE the authentication of your server, but - again - if you only want/need encryption, you can tackle this fairly easily.
The rub, of course (other than losing authentication benefits) is that most apps (well, drivers) will throw the equivalent of "this certificate can't be trusted" errors when you attempt to connect to a SQL Server running with a self signed certificate, which can add some messy complexity into the mix. That said, you can preempt this by decorating your connection strings with directives along the lines of TrustServerCertificate=true; - i.e., the effective equivalent of trusting a self-signed certificate in your browser.
Note :
Technically speaking, if your SQL Server doesn't have a CA-signed certificate, SQL Server will STILL spin up a new self-signed certificate each time it starts up so that it can encrypt login (user authentication) procedures. Importantly, drivers are NOT fussy about using this self-signed certificate for authentication purposes - they don't get a choice.
It IS, however, possible to use this same self-signed certificate as a means of forcing encryption of all OTHER traffic to/from your SQL Server - though most modern drivers are fussy enough about this that'll they'll throw an error unless you include the equivalent of TrustServerCertificate=true; for whichever driver you're using.
💡 Tip:
To enable a self-signed certificate for use in encryption (while losing authentication benefits):
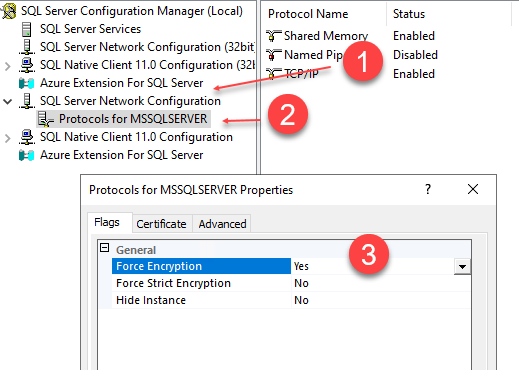
- Open up the SQL Server Configuration Manager, navigate to the SQL Server Network Configuration node,
- then right click on the Protocols for MSSQLSERVER node (or your named-instance),
- and select the Properties menu.
- Then, on the Flags tab, set "Force Encryption" to "True" to force encryption.
WARNING: This'll require a restart of your SQL Server Service, and can/will PREVENT applications from connecting if they're NOT able to 'TrustServerCertificate' and/or don't PREVIOUSLY have this enabled - so proceed with caution - and see the notes about enabling TLS at the bottom of this article).
Requirements
If you need a CA-signed TLS Certificate (for both encryption AND authentication benefits), then there are a couple of requirements to be aware of before you get started:
- The Certificate you create and deploy MUST be for Server Authentication - i.e., it's Enhanced Usage specification must encompass
1.3.6.1.5.5.7.3.1. (Your certificate CAN be signed for OTHER purposes in ADDITION to the above, but if it isn't coded for Server Authentication, it won't work.) - The CSR you generate MUST match (exactly) the fully-qualified domain name (FQDN) of your machine name. (If you're in a WorkGroup, this means you're going to have to set a DNS suffix as part of your Machine Name.)
- You MUST have access to the PRIVATE KEY used to generate your Certificate.
- Importantly, client applications connecting with this certificate must specify the FQDN of your SQL Server - otherwise not only will you fail to obtain encryption, but your apps will be ACTIVELY BLOCKED from connecting.
Warnings
Two of the requirements above are a big enough deal that they justify being called out as warnings. Specifically:
- The whole FQDN thing might seem a bit counter-intuitive at first blush, but it's not. One of the key benefits of having a CA-signed TLS Certificate is that it helps confirm that a server IS what it says it is. As such, the NAME of said server is vitally important. Specifically, applications wishing to enjoy encryption and authentication benefits MUST use the FQDN of the machine. Attempting to connect by IP address or just the machine name WON'T work. DNS aliases will also cause problems.
Warning:
One of the FEATURES of correctly securing your environment with TLS Certificates is that applications that aren't correctly configured (i.e., aren't secure), are actively BLOCKED from connecting to your SQL Server. Or, in other words, you need to make sure you get connectivity details RIGHT. This isn't as simple as: "get it right, you're encrypted; get it wrong and MERELY miss out on encryption". If you get things wrong, otherwise (functional) apps will end up busted and unable to connect.
- The need to retain access to your private key - and give SQL Server permissions to use said Private Key adds a bit more complexity to the overall process of deploying a certificate for use by SQL Server.
💡 Tip:
If you've generated CSRs and applied certificates to IIS and other 'simple' configurations where the private key is NOT needed, the few extra steps involved in ensuring that you have access to your private key (outlined below) MIGHT seem like extra work. It's NOT; the approach you use for IIS and other public-key only certs won't work here.
B. Instructions
Generating CSRs via OpenSSL
You can generate a CSR (Certificate Signing Request) using a number of different tools and approaches.
I've found that the easiest, and most repeatable method is to use OpenSSL. (Yeah, this might seem like a lot of extra work if you're used to generating CSRs for IIS/etc. - but, again, we NEED the private key for our purposes here - which complicates things a bit.)
To get going:
- Download and install OpenSSL if you haven't done so already.
- In the instructions below, I'm using OpenSSL for Windows - from the very fine folks at Shining Light Productions.
- You can pound your way through the docs and command-line of OpenSSL to then create a CSR, or ... you can cheat like I do and use the OpenSSL Creation Wizard provided by Digicert.
- NOTE: This Wizard does NOT generate the CSR for you. Instead, you punch your details into an easy-to-use form, push GENERATE, and it'll spit out the exact commands to send into the OpenSSL command prompt.
For example, I own the domain: sqlserver.id - so, say that I want to generate a CSR for SQL-160-04 within my 'sqlserver.id' domain. (In this particular case, I'd either need an AD configuration for sqlserver.id (as my domain), or I'd have to put SQL-160-04 into a WORKGROUP, and make sure that my workgroup is running with a DNS suffix of sqlserver.id - so that, either way I tackle this, the fully qualified (domain) name of my server would be SQL-160-04.sqlserver.id.)
Then, to generate a CSR for such a machine name, I'd punch in info similar to the following within the OpenSSL CSR Wizard (where the Common Name is the field that HAS to be EXACTLY correct):
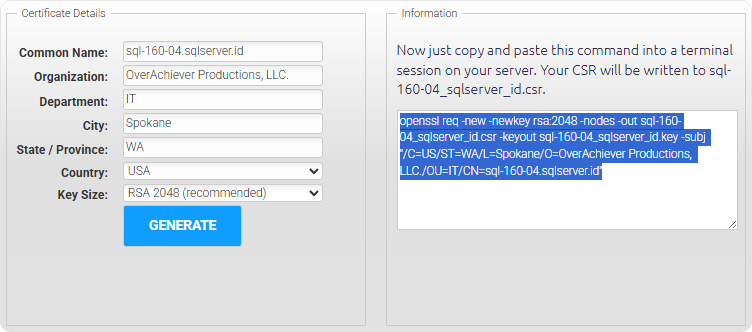
Then, as specified in the screenshot above, I'd just copy + paste the info from the right-side of the wizard into a command prompt, against openssl.
More specifically - and assuming that openssl hasn't been added to your PATH, you'd do something similar to the following:
- Right click on the Windows Start button and click on the Terminal (Admin) menu option.
Warning:
Generating CSRs WITH the Private Key Requires Elevation - i.e., you ARE going to want to run your command prompt as ADMIN.
- Navigate to the location where OpenSSL was installed, specifically: to the bin folder.
- By default, this'll be
C:\Program Files\OpenSSL-Win64\binon a 64-bit Windows 11 machine.
- By default, this'll be
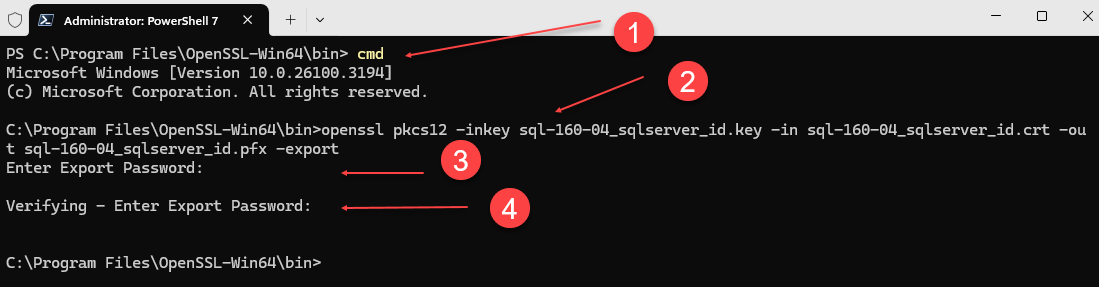
- If you're in PowerShell, switch to DOS - i.e., punch in
cmdand hit enter to switch to dos. - Now, simply paste in the information from your clipboard (from the CSR Wizard) and hit enter to generate your CSR.
Once you hit enter, you'll see something roughly similar to the following:

Likewise, once your CSR has been generated open up Windows Explorer and navigate to your OpenSSL\bin folder - where you should see 2 distinct files - a .key (the private key used to sign your CSR), and the .csr itself:
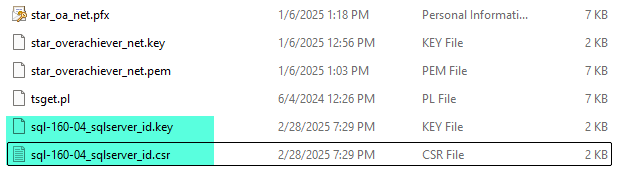
Keep your .key file handy (i.e., just keep it in this directory - or somewhere safe) - you're going to need it AFTER your cert has been generated.
Signing CSRs
Once your CSR has been generated, you can hand it off to a Certificate Authority, where your request will be validated (to prove that you are who you say you are and/or that you have the necessary authority to create certificates for the machine (well, domain) in question). Assuming that your request passes validation, a certificate will then be generated from the details specified within the CSR itself.
Note :
During the actual signing phase, you won't need your .key file at all. Just follow Gandalf's advice to Frodo for now ("keep it secret, keep it safe"), as you'll need your KEY AFTER your certificate has been generated.
Using 3rd Party CAs
If you don't have your own PKI and/or Certificate Authority, you're going to need a third party to sign your certificate for you - i.e., Sectigo, Digicert, NameCheap, or whoever you'd use for TLS (SSL) Certs for your web-servers and the likes.
Validation does occur with these 3rd parties in the sense that you'll either need to be OV (Organization Validated) or the domain you're attempting to sign for (e.g., sqlserver.id or widgetcompanyunited.com) is within your control/ownership (which you can verify either by modifying your DNS records with a TXT record, or by getting and responding to an email sent to an authoritative address at your domain).
The only REAL down-side of using a 3rd Party is that your Certificate will only be valid for ~1 year before you'll have to re-authenticate and re-sign it for continued use (even if you end up buying a multi-year certificate). And yeah, I guess there's the cost of the cert itself - but if you're running SQL Server in a production environment, the $20 or less it costs to find a decent cert is a paltry consideration.
Using Active Directory CAs
If you've got your own domain, and have deployed and set up Certificate Authority - or Signing Server, congrats, you can go this route - and sign your own certificates.
Validation, using this approach, simply comes down to whether or not you have credentials and/or permissions enough against your CA Signing Server - or, whether you know the person in your organization who manages this resource well enough to convince them that your quest is valid and that your signing request is worthy.
Warning:
Remember that the Enhanced Usage Specification for your Certificate NEEDS to be for Server Authentication/Identification. Or, in other words, make sure that when you generate a certificate on your Certificate Signing Server, you're using a SERVER template.
And, if you're ONLY seeing the default Templates (User and Basic EFS), make sure to follow the excellent, and detailed, instructions from firewall.cx on how to add additional templates into the mix.
💡 Tip:
Setting up a Certificate Signing Server is well outside the scope of this article, but, the fine folks at Firewall.cx have a great tutorial on how to set this up.
Using Let's Encrypt
I haven't yet, personally, worked out the specifics for this option. There are some tutorials here/there on the interwebs outlining these details.
To me, though, while the 'win' of not having to PAY for your 3rd Party Certs makes sense - the true COST of that (having to restart your SQL Server Service every few months) 'benefit' makes the whole thing moot. (For production-level SQL Servers you don't want to incur service restarts every few months just to top-off your TLS Certs - or even try to encumber patching windows with trying to juggle this 'bonus' requirement.)
Otherwise, do note that if you go this route, you will - still - be required to go through a validation process, as Let's Encrypt will require you to confirm ownership of any domains you wish to sign for.
Converting CRTs to PFXes
Once your CSR has been approved, you should get a .crt (some CAs might send you a .cer file - which is effectively the same thing) file back from your CA (internal or third party).
The contents of this file are the public key details for your certificate.
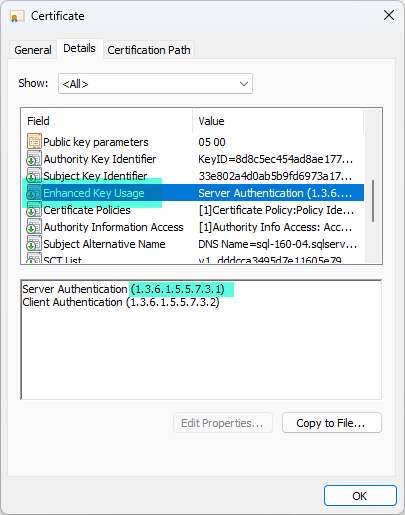
💡 Tip:
You can double-click on .crt files to open them within Windows. They'll pop into a UI - where you can check things like the Details - including Enhanced Key Usage details (where you can verify that your certificate supports Server Authentication (1.3.6.1.5.5.7.3.1)).
Before you import this certificate into Windows, you have to JOIN your .crt and the .key you generated earlier to combine your certificates PUBLIC data with the Private Key information - as SQL Server will need access to both details in order to successfully bind your certificate whenever it starts up.
To combine public and private certificate details using OpenSSL, do the following:
- Copy your
.crtfile into the OpenSSL\bindirectory - where your.keyfile was dropped/created. - With your
.crtand.keyfile in the same location, you're now ready to tell OpenSSL to combine the two sets of details - and output a.pfxfile (which'll be password encrypted). - The command for this is effectively the following:
OpenSSL pkcs12 -inkey <path to your key file>.key -in <path to your CA-signed cert file>.crt -out <path to output>.pfx -export- And, you'll be required to input a password - 2x - during this process.
For example, here's what I punched in to convert my sql-160-04.sqlserver.id.key file + sql-160-04.sqlserver.id-from-my-ca.crt file into a .pfx:
💡 Tip:
Don't forget to make sure you're in DOS (cmd) mode.
If all goes well, you won't get any errors AND you'll see a new .pfx file in your bin folder.
(And, yes, you can stage and/or output these files anywhere - I just chose do EVERYTHING in the bin folder as a) this keeps path names simple and b) it requires elevation to GET into this folder.)
Installing the Certificate
Now that you've combined your certificate and key details into a .pfx file, you're ready to import your certificate into Windows on your SQL Server.
The easiest way to do this is:
- Copy the
.pfxfile to your SQL Server. - Double-click on your
.pfxfile to open it - and start the import process. - Within the Certificate Import Wizard, make sure to specify the "Local Machine" option:
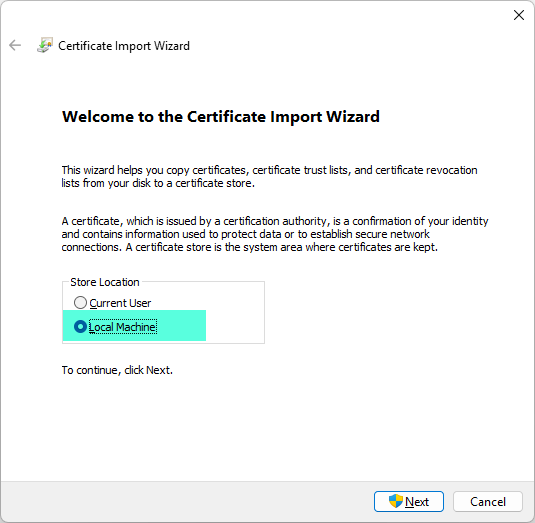
- Then Click Next, Next.
- Enter the Password that you used previously - for the
.pfxfile (when you were combining your.keyand.crtfiles). - Then click Next (you don't need to modify any of the other options in most cases).
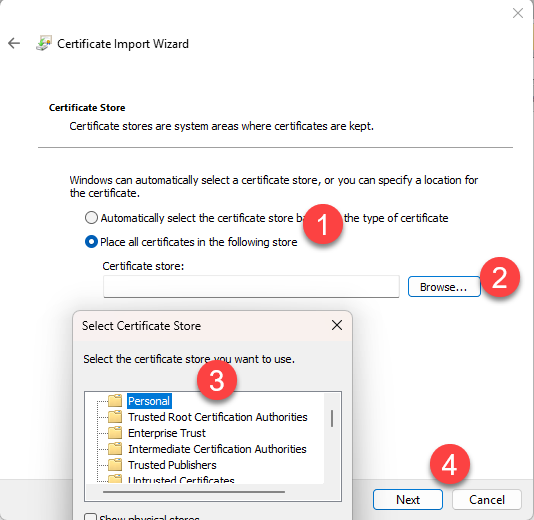
- On the Certificate Store page, click on "Place all certificates in the following store", and then select the Personal store via the Browse button/option - then click Next.
Warning:
If you keep getting errors saying that the password you specified is invalid, and you're CONFIDENT that it's correct, then congrats: you've stumbled upon some FUN bugs within Windows where this import process simply LIES to you by telling you that your password is incorrect when, in fact, there's another problem.
Most of the time, this 'other' problem will be one of three issues:
a) Double-check that your .crt file was signed for Usage 1.3.6.1.5.5.7.3.1 - i.e., double-click on the .crt file generated by your signing server, switch to the Details pane and then look at the values for "Enhanced Key Usage". If you're NOT seeing 1.3.6.1.5.5.7.3.1 (exactly as specified) as one of the usages, you'll have to re-sign the CSR/Certificate - making sure to target Server Authentication as one of the Usage details.
b) If you used your own Certificate Signing Server, its Root/Authority Certs SHOULD be trusted by all boxes in your domain. In... some weird cases, this isn't the case, and you'll have to pop back out to your Certificate Signing Server and click on the Download certificate chain link, then install/deploy your CA's signing chain into your local machine Root Authority certificates store.
c) If your SQL Server is running on an OLDER version of Windows (e.g., Windows Server 2016) and your Certificate was signed on a NEWER version of Windows, there may be some incompatibilities with the .pfx. To get around this, open/import the .pfx on a newer Windows server, and - during import (on the screen where you specify your password), check the "Mark this key as exportable..." check box option. Finish the import, open up Certificates (MMC), then EXPORT the certificate (as a .pfx) with a password, and the COPY this .pfx to your older SQL Server box, and it should import.
Granting SQL Server Permissions on Private Key
Once the certificate has been imported, you need to grant your SQL Server Service Account permissions to manage key information (so that it can bind your certificate during SQL Server Startup).
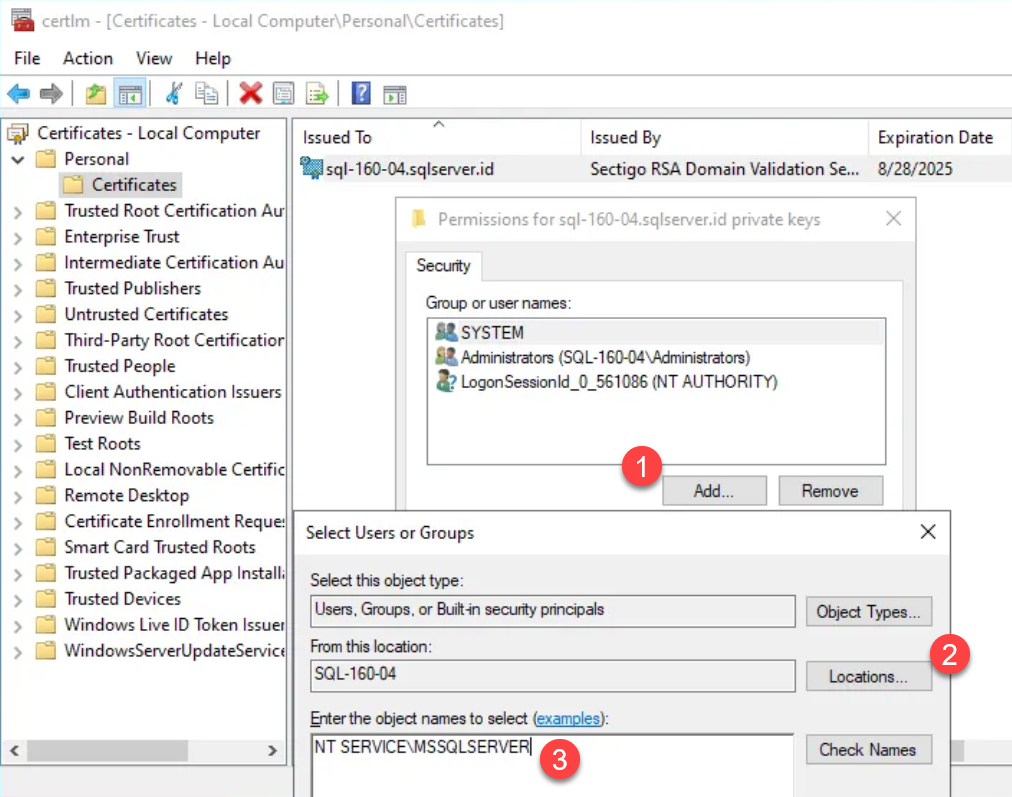
To do this,
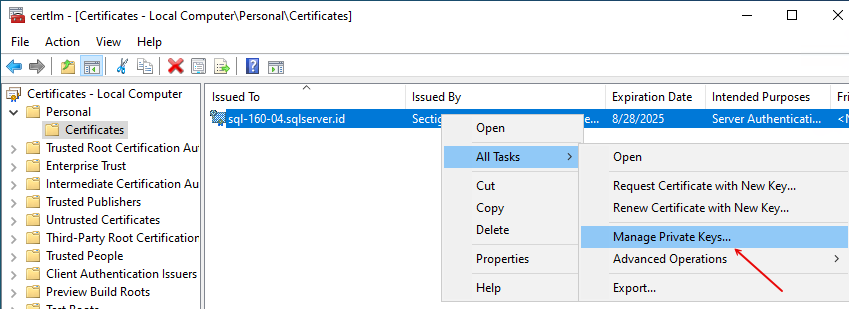
- Right-click on Start, click on Run, and then enter
certlm.msc- to launch the Local Machine Certificate Manager MMC. - Navigate to Personal > Certificates, then find your imported .pfx/Certificate, and right-click on it.
- From the context menu, select All Tasks > Manage Private Keys.
- From the Security tab that pops up, click on Add...
- From the Select Users or Groups dialog, make sure you're working against the LOCAL machine (i.e., NOT your Domain, etc.),
- Then enter either
NT SERVICE\MSSQLSERVERif you're running a Default (non-named instance), otherwise, specifyNT SERVICE\MSSQL$<instance_name_here>if you're running a named instance.
💡 Tip:
Yes, you can specify the EXACT account that you're running your SQL Server as - e.g., MyDomain\$sql_160_xx_service_account or MyBoxName\sql_service - but if you EVER CHANGE what your SQL Service runs as, you'll have to EXPLICITLY re-grant these permissions, otherwise SQL Server won't start as it won't have permissions needed to bind your certificate.
Or, in other words, using 'virtual' accounts future-proofs you against any service-account changes.
Congrats, you're now done with the tedious parts.
Binding the Certificate
You're almost done; two tasks left:
- Binding the Certificate, and
- Restarting your SQL Server Service (which you'll want to be a bit careful doing).
To bind your newly imported certificate:
- Launch the SQL Server Configuration Manager (Start > Microsoft SQL Server xxx > SQL Server xxx Configuration Manager).
- Expand the SQL Server Network Configuration Manager node, and then right click on Protocols for MSSQLSERVER (or your named instance) and select Properties.
- Switch to the Certificate tab, and your certificate SHOULD be available in the drop-down. (If it's not, double-check previous steps - especially those around making sure that your SQL Server Service has permissions against the Private Key (Management) details for your certificate.)
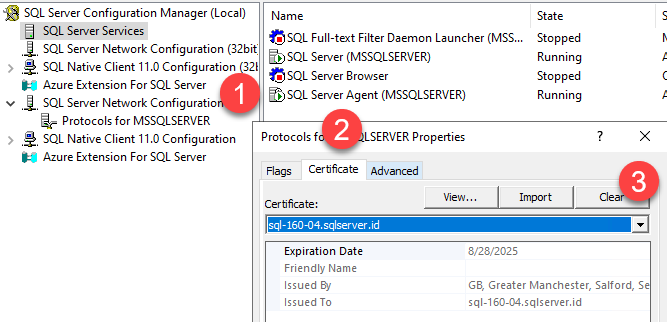
- After specifying your Certificate, click OK to save it as the Certificate that SQL Server should use the the next time it starts up. (You'll be notified that this change will NOT take effect until SQL Server is restarted.)
Enabling TLS
You have two main options when it comes to enabling encryption against your SQL Server:
a) You can 'offer' (or make available) to clients / applications the option to connect using your newly bound certificate (which you do by simply binding the certificate in place and restarting).
b) Or, you can instruct SQL Server to REQUIRE that any attempt which attempts to connect MUST be using Encryption - i.e., via the Force Encryption option from the Flags pane of the Protocols page. This is the MOST secure (and recommended) option. With this second option, you are, in effect, saying: "Either the apps that want to connect have updated drivers that can speak TLS (ideally 1.2 or above - only), and have correctly specified the FQDN of the SQL Server, or they can't connect. Period.".
Warning:
In theory, the first option (NOT forcing encryption) should prevent ugly scenarios where an application (think of apps with older drivers that don't adequately support TLS) that doesn't "want" to use TLS isn't forced to do so, and - in theory - wouldn't run into connection issues IF you merely 'offered' the certificate for use.
Unfortunately, the THEORY on this isn't always what you'll see in production or the real-world.
Specifically, there ARE some odd issues with drivers in certain scenarios where the mere addition of a bound certificate can - and will - block all connections from a certain set of drivers. And, short of either a) removing the certificate (and restarting) or b) (in most cases) adding the equivalent of TrustServerCertificate=true; to your connection strings, ... your apps will be down, hard.
Likewise, it should go without saying that FORCING ENCRYPTION can cause problems with any OLDER applications (drivers) that haven't been updated in a long while.
Translation: Unless you're super comfy with applications not being able to connect (i.e., down-time), make sure to run some tests on down-level server before making this switch in production - or, at the very least, make sure to make these changes (i.e., enabling a bound TLS certificate) during a scheduled maintenance window.
95% of the time you won't have any problems - but in cases where you do, the fix might be ugly/complex (like updating drivers on app servers - yeah, good luck with any side effects), or moderate to easy (anything from 'TrustServerCertificate' in connection strings all the way to "Run away! Run Away!" where you revert (remove the Cert) and try to come back later with a Giant Wombat). Either way, you probably don't want to be sorting these details out when your apps are scheduled to be up and running.
Information :
For an example of how BAD things CAN get with SOME mainstream drivers, see this gem:
[MSOLEDBSQL19 Bug with Trust Server Certificate](https://www.totalsql.com/sql-server-content/kb-articles/msoledbsql19-bug-with-trust-server-certificate)
Connecting to Certificate-Enabled SQL Servers
In theory, connecting should be pretty straight forward - and is if you've opted to Force Encryption. On the other hand, if you haven't opted to Force Encryption, you might run into some odd scenarios that can be counter-intuitive and/or a bit tricky to tackle - in SOME cases.
Forced Encryption
If you've gone with the option to Force Encryption, then ALL of your apps are going to need to do one of two things to be able to continue to connect:
a) Specify the FQDN of your SQL Server - if this hasn't been done previously, e.g., if you were connecting to 10.72.10.164 or SQL-160-04 previously, you'll HAVE to switch to the FQDN: SQL-160-04.sqlserver.id (case does NOT matter, but correct spelling/FQDN-ness does).
b) Or, if for some odd reason, you can't specify the FQDN, then you'll need to decorate your connection string with the equivalent (based on your drivers/providers) of TrustServerCertificate=true; in order to keep connecting.
Obviously, using the FQDN is the hands-down best option here - but if push comes to shove (and you've got older apps that just can't use that connectivity info - for whatever reason), then apps using the 'TrustServerCertificate' option will still be able to connect, AND will be encrypted - they'll just be missing authentication benefits.
Non-Forced Encryption
First and foremost, you will NOT be able to pick up any encryption (or authentication) benefits - even with your certificate properly installed - UNLESS your applications are connecting against the FQDN of your SQL Server host. (IP addresses won't work, host-names won't work, and most DNS aliases won't work - only FQDN will do the trick.)
Second, with SOME drivers, even if you haven't opted to Force Encryption, applications that ARE connecting against the FQDN (previously or now - via modified connection strings) MAY end up being enlisted for encryption/authentication or ... might NOT.
The above can be tricky for two reasons:
- first, if you've been connecting against the FQDN previously, and have older drivers, they MAY attempt to FORCE encryption without any other changes on your part; but, if said drivers are OLDER-enough to force encryption but are 'speaking an incompatible dialect' of said encryption protocols, you might end up with apps that USED to be able to connect without any issues now being 100% blocked from connecting and throwing odd errors (usually with something to the effect of having
sslin the error message). - second, with SOME drivers, simply connecting to the FQDN and having a certificate in place is NOT enough - and you'll have to specify some additional directive (in your connection string) that specifies that (data) encryption is now mandatory. Or, in other words, in a few edge-cases it may be possible to CONNECT (without errors/problems) to a certificate-enabled SQL Server WITHOUT communications being encrypted.
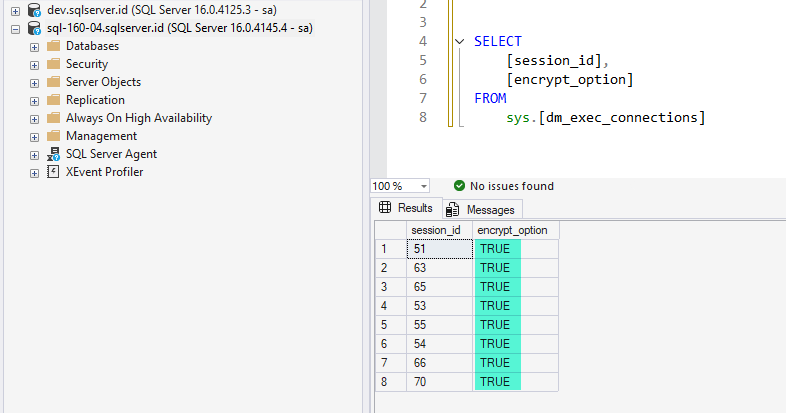
Verifying Encryption
Otherwise, once you restart your SQL Server Service verifying encryption is pretty easy.
Firstly, if you've selected the option to Force Encryption and restarted, then any application that is able to connect WILL, 100%, be using encryption. Otherwise, it simply could NOT have connected. Period.
On the other hand, if you've NOT chosen to Force Encryption, then whether or not your applications enlist encryption when connecting is, effectively, up to them (in theory; again: there are some cases where drivers won't play by these rules) - and the details defined within your connection strings, DSNs, etc.
That said, you can easily CHECK or validate encryption from within SQL Server itself - against current connections via sys.dm_exec_connections via the encrypt_option column:
Appendix A: TLS Levels
NOTE: This'll be updated at a future point - with information on how SSL is vulnerable/superseded and no longer safe to use. Ditto TLS 1.0, and 1.1 - to the point where only TLS 1.2 and 1.3 are considered viable (safe). I'll then provide a link to a KB article on how to go about forcing Windows Servers to PREVENT connections from any apps/clients that can't 'speak' TLS 1.2 or above.
Appendix B: Connection Strings
NOTE: This too will be updated a future point - with some high-level notes on options for specifying encryption options - such as 'Force Encryption', 'TrustServerCertificate' and the likes.